- Published on
使用Hexo和Github搭建博客2021
MacOS 10.14.5 Hexo 6.0.0 NexT 8.8.2
Node.js 12.22.10 Git 2.15.0
一、准备Github账号及创建Repository
参考教程:Github账号注册及仓库创建
二、准备电脑环境
可以用homebrew安装,也可以去官网下载 binary 直接安装,这里使用homebrew。
Homebrew
完整教程请参考:Homebrew官方安装 解决Failed to connect 443
Node.js
务必要安装node.js管理工具 NVM,不然之后使用 node.js 会踩坑。
详细安装方法参考:
在Terminal输入:
brew install node
安装后检查是否安装成功
node -v
检查npm是否安装成功,npm是node.js的包管理工具,用它来安装hexo
npm -v
Git
在Terminal输入:
brew install git
检查git是否安装成功
git -v
Hexo
sudo npm install -g hexo-cli

# 查看是否安装成功
hexo -v
三、准备SSH Key
有一些教程用了Https,建议别用,因为可能会影响梯子。SSH Key不会受影响,而且也不难。
报错信息:SSL_connect: SSL_ERROR_SYSCALL in connection to github.com:443
解决方案:关掉VPN或使用SSH Key
在Terminal输入
git config --global user.name "username"
git config --global user.email "email@gmail.com"
其中
username是你的用户名,email@gmail.com是你github的登录邮箱,请自行替换。
生成SSH Key
ssh-keygen -t rsa -C "email@gmail.com"
email@gmail.com是你github的登录邮箱,请自行替换。
一路回车下去就行,使用命令行输出SSH Key
cat ~/.ssh/id_rsa.pub
生成的SSH Key会放在
~/.ssh/id_rsa.pub目录下
在github账号找到 setting,先点击 SSH and GPG keys 然后再点击 New SSH key 进入到配置 SSH Key 的页面。
- 在Title中记录好SSH的用处,避免遗忘,比如:SSH for Blog on MBP。
- 在Key中粘贴SSH Key。
- 点击
Add SSH Key
四、准备本地文件
创建一个文件夹用于存放与博客相关的文件,例如MyBolg,在Terminal中输入:
cd ~/MyBlog
在该文件件目录下执行博客初始化操作
# 会下载一些node.js的依赖文件
hexo init
初始化成功后,启动服务器
hexo s
# 或者
hexo server
当看到如下输出就可以预览我们创建的博客了
INFO  Validating config
INFO  Start processing
INFO  Hexo is running at http://localhost:4000 . Press Ctrl+C to stop.
在浏览器输入http://localhost:4000,打开如果出现Hexo默认的主题,则说明这一步成功了。
在Terminal按下Ctrl+C,与服务器断开。
为了能够使本地的Hexo部署到GitHub上,需要安装插件,在Terminal输入
sudo npm install hexo-deployer-git --save
在Finder中找到创建的MyBolg文件夹,找到_config.yml文件。将最下面的depoly部分改成:
deploy:
  type: git
  repo: git@github.com:wechiwin/wechiwin.github.io.git
  branch: master
报错信息:You should configure deployment settings in _config.yml first! Available deployer plugins: git
注意:下面三行【有空格】,即
typerepobranch必须处于同一缩进。粘贴上面的代码后仅修改用户名即可。参考教程:https://www.cnblogs.com/imtudou/p/11205832.html
报错信息:
清除缓存
hexo c
# 或者
hexo clean
生成博客文件
关于Hexo的一些命令,可以参考Hexo官网:https://hexo.io/zh-cn/docs/commands
hexo g
# 或者
hexo generate
将本地的博客文件push到github
hexo d
# 或者
hexo deploy
Warning:
The authenticity of host 'github.com (20.205.243.166)' can't be established.
ECDSA key fingerprint is SHA256:......
Are you sure you want to continue connecting (yes/no)?
这里直接输入yes即可。
现在,在浏览器输入username.github.io就可以访问博客了(例如:wechiwin.github.io),现在的界面依旧是默认的Hexo主题和hello-world.md。
参考教程:
五、第一篇博客
在搭建博客的过程中一定会遇到各种报错和各种尝试,记下来之后不妨直接把它作为第一篇博客。
我使用的是Typora+Idea,使用Idea将MyBlog作为Project打开,进行管理。Typora就用来专心码字。
找到~/MyBlog/source/_posts/hello-world.md,里面放的就是你在自己的博客网站上看的内容。
使用 hexo new
如果是在 Terminal 使用 hexo new 命令,hexo会自动帮你加上 front matter。
Front Matter 是用来记录你文章信息,使用的是 YAML 语言。
在一开始,你的 Front Matter 可能只有 title 和 date。
title: Hello World
date: 2013/7/13 20:46:25
随着之后的探索,目前我的 Front Matter 如下:
title: macOS使用Hexo和Github搭建博客2021
description: ' '
date: 2021/12/29 16:16:49
tags: [Hexo,Github,macOS]
categories: [Blog]
自己新建md文件
需要手动将YAML信息放在文章顶部,在第一行键入---,Typora会自动显示,请输入YAML信息,同时字体和正文会不一样。
六、更换主题
我们可以先在本地预览一下效果,在Terminal中输入hexo s,然后打开localhost4000。很明显,这个主题的效果不太让人满意。
Hexo官网主题:https://hexo.io/themes/
https://github.com/theme-next/hexo-theme-next https://github.com/litten/hexo-theme-yilia https://github.com/viosey/hexo-theme-material https://github.com/LouisBarranqueiro/hexo-theme-tranquilpeak https://github.com/pinggod/hexo-theme-apollo https://github.com/ppoffice/hexo-theme-icarus
这里以NexT主题为例,版本为8.8.2,非原NexT团队制作。
确认Terminal在MyBlog文件夹下,输入
git clone https://github.com/next-theme/hexo-theme-next themes/next
此时可以在MyBlog/themes文件夹里看到下载的next。
打开MyBolg/_config.yml文件,将theme后面的landscape修改为next
# Extensions
## Plugins: https://hexo.io/plugins/
## Themes: https://hexo.io/themes/
theme: next
在Terminal中输入hexo c清除缓存,然后输入hexo s启动服务器,刷新localhost:4000,就能预览新的主题了。
七、增加评论插件
折腾了几个,最后找到了如下教程,简单好用。
参考教程:使用 Utterances 作为静态博客的评论插件
注:将HTML代码直接粘贴到文章末尾即可,想要评论的人需要先用github的账号登陆。
更新:
一开始使用的是原next主题,更新8.8.2版本的next之后,发现已经集成了 Utterances 评论插件,在 theme/_config.yml 中打开即可。
# Utterances
# For more information: https://utteranc.es
utterances:
  enable: true
  repo: wechiwin/wechiwin.github.io
  # Available values: pathname | url | title | og:title
  issue_term: pathname
  # Available values: github-light | github-dark | preferred-color-scheme | github-dark-orange | icy-dark | dark-blue | photon-dark | boxy-light
  theme: github-light
八、标签和分类
只有文章支持分类和标签,在 Front-matter 中设置。
1. 分类
新建 categories 页面
如果没有categories页面,我们可以新建:
hexo new page categories
分类具有顺序性和层次性
# 这样的写法,会使分类 Life 成为 Diary 的子分类,而不是并列分类。
categories:
- Diary
- Life
并列分类写法
categories:
- [Linux]
- [Tools]
并列+子分类
categories:
- [Linux, Hexo]
- [Tools, PHP]
2. 标签
新建 tags 页面
如果没有tags页面,我们可以新建:
hexo new page tags
没有顺序和层次
写法一:
tags: [Java,MySQL]
写法二:
tags:
- PS3
- Games
参考链接:官方文档
3. 生成模板
打开 scaffolds/post.md 模板文件,在加入categories:或者tages:,保存后,之后执行hexo new 文章标题命令生成的文件,页面里就有该项了。
scaffolds目录下,是新建页面的模板,执行新建命令时,是根据这里的模板页来完成的,所以可以在这里根据你自己的需求添加一些默认值。
参考教程:
九、显示大纲 TOC
修改MyBlog/themes/next/_config.yml
# Table of Contents in the Sidebar
# Front-matter variable (nonsupport wrap expand_all).
toc:
  enable: true
  # Automatically add list number to toc.
  number: false
  # If true, all words will placed on next lines if header width longer then sidebar width.
  wrap: true
  # If true, all level of TOC in a post will be displayed, rather than the activated part of it.
  expand_all: false
  # Maximum heading depth of generated toc.
  max_depth: 6
注:如果出现了大纲无法显示的情况,可以先设置enable: false,clean&deploy后再设置enable: true。
十、添加本地搜索
在MyBlog文件夹下安装插件:
npm install hexo-generator-searchdb --save
修改MyBlog/_config.yml 文件,添加如下内容:
# Local Search
search:
  path: search.xml
  field: post
  format: html
  limit: 10000
修改MyBlog/themes/next/_config.yml
# Local Search
# Dependencies: https://github.com/next-theme/hexo-generator-searchdb
local_search:
  enable: true
  # If auto, trigger search by changing input.
  # If manual, trigger search by pressing enter key or search button.
  trigger: auto
  # Show top n results per article, show all results by setting to -1
  top_n_per_article: 1
  # Unescape html strings to the readable one.
  unescape: false
  # Preload the search data when the page loads.
  preload: false
十一、替换网站图标
自己制作或者下载16 x 16px以及32 x 32px的PNG格式图标。将图片放在MyBlog/themes/next/source/images/下。
打开MyBlog/themes/next/_config.yml,查找favicon,将small和medium后的favicon-16x16-next替换为对应像素的图片的名称。
favicon:
  small: /images/favicon-16x16-next.png
  medium: /images/favicon-32x32-next.png
  apple_touch_icon: /images/apple-touch-icon-next.png
  safari_pinned_tab: /images/logo.svg
  #android_manifest: /manifest.json
十二、设置个人头像
打开MyBlog/themes/next/_config.yml,查找avatar,将url后的avatar.gif替换为自己图片的全名。
# Sidebar Avatar
avatar:
  # Replace the default image and set the url here.
  url: /images/avatar.gif
  # If true, the avatar will be displayed in circle.
  rounded: false
  # If true, the avatar will be rotated with the cursor.
  rotated: false
参考教程:4.美化
十三、设置快捷指令
每次更新内容都需要在Terminal输三遍命令,很麻烦,可以使用alias设定别名。之后只要在Terminal输入指定的别名就可以了,但是仅对当前会话生效。
疑问:怎么永久生效?js?
# hs 本地部署
alias hs='hexo clean && hexo g && hexo s'
# hd 远程部署
alias hd='hexo clean && hexo g && hexo d'
十四、使用Hexo新建md文档并自动打开Typora
在MyBlog文件夹下新建scripts文件夹,并新建auto_open.js文件。
var exec = require('child_process').exec;
hexo.on('new', function(data){
// 请将 Typora 替换为你用的Markdown 编辑器
exec('open -a "Typora.app" ' + data.path);
});
注:如果出现使用hexo new 没有反应,请检查Terminal是否在MyBlog文件夹下
十五、永久链接
有时候写文章需要引用网站内的其他文章,原本的默认链接很长,需要修改永久链接的配置。
打开_config.yml 文件,修改如下信息
# URL
url: https://wechiwin.github.io
# 确保永久链接的唯一性
permalink: :year/:month/:day/:hour/:minute/:second/
注意:如果 permalink 最后面没有加/,那么打开文章时,文章会变成文件,浏览器会自动下载。
参考教程:hexo排坑——页面跳转变成了下载
十六、SEO
生成Sitemap
修改配置文件 theme/_config.yml
menu:
  home: / || fa fa-home
  #about: /about/ || fa fa-user
  tags: /tags/ || fa fa-tags
  categories: /categories/ || fa fa-th
  archives: /archives/ || fa fa-archive
  #schedule: /schedule/ || fa fa-calendar
  # 修改这个并不会在首页显示 sitemap 选项
  sitemap: /sitemap.xml || fa fa-sitemap
  #commonweal: /404/ || fa fa-heartbeat
在MyBlog文件夹下安装插件,自动生成sitemap:
npm install hexo-generator-sitemap --save
npm install hexo-generator-baidu-sitemap --save
修改配置文件 _config.yml
# Extensions
## Plugins: https://hexo.io/plugins/
plugins:
  - hexo-generator-baidu-sitemap
  - hexo-generator-sitemap

baidusitemap:
  path: baidusitemap.xml
sitemap:
  path: sitemap.xml
更新部署,在浏览器输入
https://wechiwin.github.io/sitemap.xml
https://wechiwin.github.io/baidusitemap.xml
两个文件都能正常显示,成功。
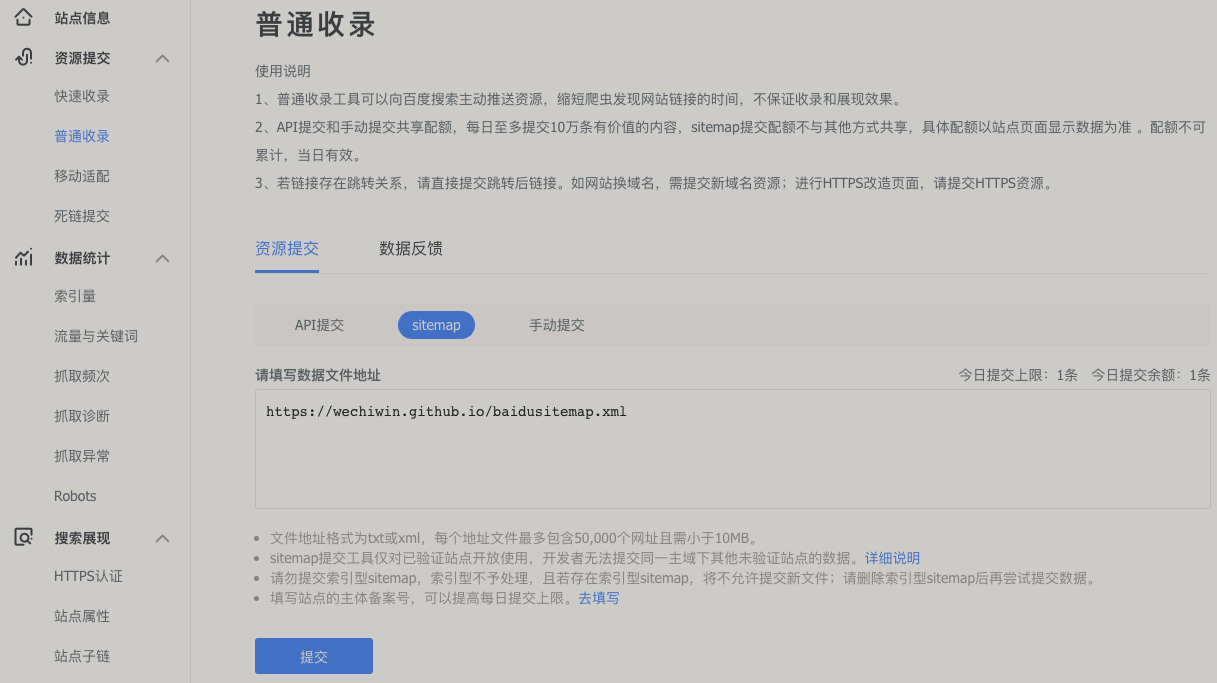
将sitemap提交给搜索引擎
使用谷歌搜索 site:your website address,例如 site:wechiwin.github.io,若没有返回结果,说明谷歌没有收录你的网站。
打开谷歌的网站 https://search.google.com/search-console/ ,登录,会让你选择验证网站的方式(证明网站是你的)。
左边Domain是使用DNS验证的方式,这个是自己有域名/GitHub Enterprise才能用的。
所以这里选择右边的 URL 验证方式,把网站主页的链接粘贴到输入框,点击继续。
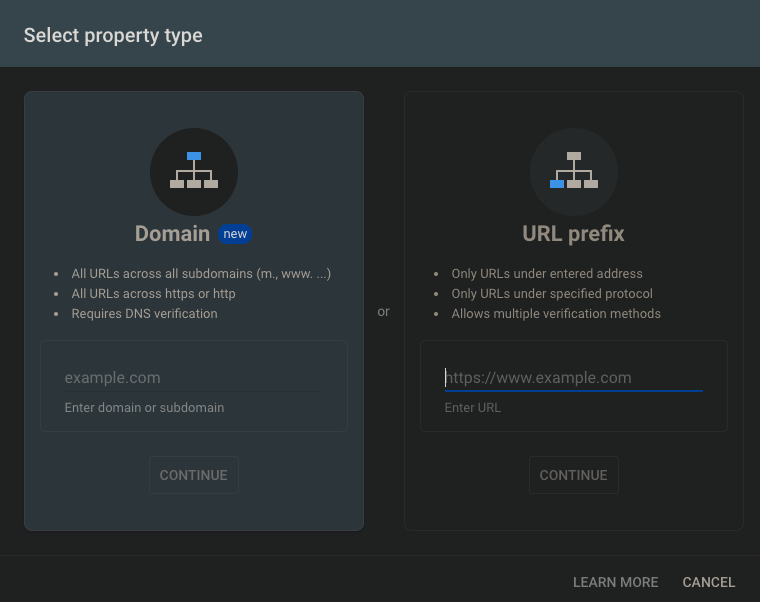
验证方式选择 HTML tag,会出来如下的代码,复制content的值。
<meta name="google-site-verification" content="hkH1lXIqT_al860tyTKTgIpzJ-cZryvL_i3tw1uOoq8" />
打开 theme/_config.yml ,将值粘贴到 google_site_verification 后面。
google_site_verification: hkH1lXIqT_al860tyTKTgIpzJ-cZryvL_i3tw1uOoq8
更新部署,然后回到 search console,点击verify,成功。
提交 sitemap

显示成功即可。
官方教程:https://theme-next.js.org/docs/theme-settings/seo.html?highlight=google
Bing
需要 Microsoft / Google / Facebook 账号,其他操作类似。
Baidu
百度需要账号和实名认证。
其他的操作类似。
注意,官方教程里说有个选项可以修改。
参考教程:
Hexo -8- 生成 sitemap 提交给Google、百度站长
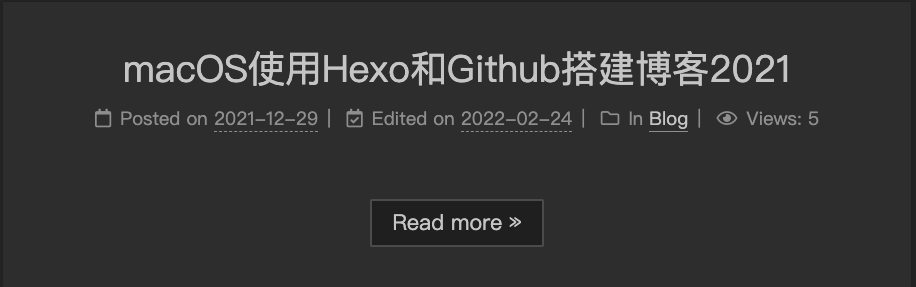
十七、Read More
网上有很多种方法,在这里介绍一下我正在使用的。就是直接在模板中加入
description: ' '
效果如下